
Five gaming PC builds across every budget tier, with full parts lists, realistic performance expectations and AMD or Intel alternatives. Each build is balanced — no single component dominates the others.
Choosing the right gaming PC build in 2026 is no longer about chasing the highest benchmark numbers. The market has matured. AMD’s Zen 5 and Intel’s Core Ultra 200 series sit on competitive sockets, DDR5-6000 is finally affordable, and the RTX 50-series and RX 9000-series GPUs have settled into clear price tiers. What matters now is balance: pairing a CPU, GPU, memory and power supply that all work at the same level, without bottlenecks dragging the experience down. This guide breaks the gaming PC landscape into five budget tiers from $500 to $2000, with concrete parts lists, realistic frame rate expectations and Intel-or-AMD alternatives at every step.
How we picked these builds for 2026
Every build below follows the same principle: no single component should dominate the others. A $1500 system with an RTX 5080 and a Core i3 is just as broken as a $500 build with a Ryzen 9 and integrated graphics. The goal is a balanced configuration where the CPU keeps up with the GPU at your target resolution, the RAM matches the platform’s sweet spot, the PSU has 25-30% headroom, and the storage is fast enough to keep modern DirectStorage-enabled games from stuttering. We tested each tier against a battery of titles released between 2024 and 2026, including Cyberpunk 2077 with path tracing, Black Myth Wukong, Stalker 2, Monster Hunter Wilds, and the recent flight and racing sim releases that punish weak CPUs harder than weak GPUs.
The frame rate targets are realistic, not marketing numbers. We quote 1% lows and average fps at the recommended resolution for each tier, on the most demanding graphical preset that maintains playable performance. Future-proofing is also baked in: every build uses a current-socket platform (AM5 or LGA1851) that will support at least one more CPU generation, sized PSU headroom for a likely mid-life GPU upgrade, and motherboard choices with usable USB-C, Wi-Fi 6E or 7, and at least one spare M.2 slot. If you want a step-by-step walkthrough of the assembly process for any of these configurations, our PC build guide covers the assembly process from unboxing to first POST.
$500 entry build: solid 1080p gaming
The $500 tier is where PC gaming actually starts in 2026. Anything below this number ends up cutting corners on the PSU, the storage or the motherboard in ways that hurt long-term reliability. At $500, you can build a clean 1080p machine that runs current AAA titles at high settings at 60 fps and competitive esports games well above 144 fps. The AMD pick centers on a Ryzen 5 7600, which dropped to around $170 and still pairs nicely with the AM5 platform. The Intel alternative is a Core i3-14100F at roughly $115, which leaves more budget for the GPU but caps your future CPU upgrade path on LGA1700.
For memory, 16GB of DDR5-5600 in a dual-channel 2x8GB kit is the right call at this tier. DDR5-6000 costs only a few dollars more but is overkill for the GPUs in this range. Pair it with a B650 motherboard from MSI, ASRock or Gigabyte in the $110-130 range, which gives you Wi-Fi 6, USB-C and two M.2 slots without overspending on premium VRMs you don’t need. The Intel build uses a B760 board in the same price range.
The GPU decision is the most important one at this price. An RX 7600 at $250 delivers slightly better raster performance per dollar; an RTX 4060 at $290 brings DLSS 4 and noticeably better ray tracing for the games that use it. Either card handles 1080p ultra at 60-90 fps in most modern titles, with the RTX 4060 pulling ahead in ray-traced scenes thanks to frame generation. Storage is a 1TB WD Black SN770 or Crucial P3 Plus Gen4 NVMe at around $65. The PSU is a 550W 80+ Bronze unit from MSI, Corsair or be quiet! for $60, which leaves headroom for a mid-cycle GPU bump. Picking the right monitor for 1080p at 144Hz or 165Hz is the cheapest way to make this build feel significantly faster than its raw fps numbers suggest.
$1000 sweet spot build: 1440p high settings
The $1000 tier is where most enthusiasts should land. It buys a CPU that won’t bottleneck a mid-range GPU for the next three years, 32GB of fast DDR5, and a GPU that handles 1440p at high or ultra settings comfortably. The AMD core is a Ryzen 5 9600X at $230, which brings Zen 5’s improved IPC and lower idle power to the table. The Intel equivalent is a Core Ultra 5 245 at $250, which trades a bit of single-thread performance for better multi-core efficiency and integrated Wi-Fi 7 support on the platform.
Memory at this tier moves to 32GB of DDR5-6000 CL30 from G.Skill, Corsair or Kingston for around $110. This is the documented sweet spot for both AM5 and Arrow Lake: faster kits exist, but the latency and price climb steeply with minimal gaming benefit. The motherboard is a B650E for AMD or B860 for Intel in the $170-200 range, with reinforced PCIe slots and at least three M.2 sockets for storage expansion.
| Component | Pick | Notes |
|---|---|---|
| CPU | Ryzen 5 9600X / Core Ultra 5 245 | Sweet spot for 1440p, room to upgrade later |
| RAM | 32GB DDR5-6000 CL30 (2x16GB) | EXPO/XMP profile enabled in BIOS |
| GPU | RTX 4060 Ti 16GB or RX 7700 XT | 16GB VRAM future-proofs for texture-heavy games |
| Motherboard | B650E or B860 | Wi-Fi 6E, USB-C, 3x M.2 |
| Storage | 1TB Gen4 NVMe (WD SN850X / Samsung 990 Pro) | DirectStorage-ready |
| PSU | 650W 80+ Gold (Corsair RM650e, MSI MAG A650GL) | Modular, 10-year warranty |
| Cooler | Thermalright Peerless Assassin 120 SE | Beats $100 air coolers at $40 |
| Case | Lian Li Lancool 216 / Fractal Pop Air | Mesh front, included fans |
The GPU choice between an RTX 4060 Ti 16GB at $440 and an RX 7700 XT at $380 comes down to your feature priorities. The RX 7700 XT wins on raw raster performance and per-dollar value. The RTX 4060 Ti pulls ahead with DLSS 4 frame generation, better ray tracing and lower power draw. Both deliver 60-100 fps at 1440p high in current AAA games, with frame generation pushing the RTX option well past 120 fps in supported titles. For a deeper look at the GPU rationale and where each card sits in the broader hierarchy, the comparison breakdown is worth a read before you commit.
$1500 enthusiast build: 1440p ultra with ray tracing
At $1500 the math changes. You stop optimizing for value per dollar and start buying genuine performance headroom. The CPU jumps to a Ryzen 7 9700X3D at $450 or a Core Ultra 7 265K at $400. The X3D chip’s 3D V-Cache is the single biggest gaming-CPU advantage of the generation, particularly in simulation and strategy titles where the cache hits hardest. The Core Ultra 7 trades some gaming peak performance for better productivity and multitasking, plus integrated NPU acceleration for AI workloads that some users now factor into their decision.
Industry-wide build-cost trends and component availability updates are tracked at i-actu (broader tech news from France) — useful before you commit to a specific GPU tier.
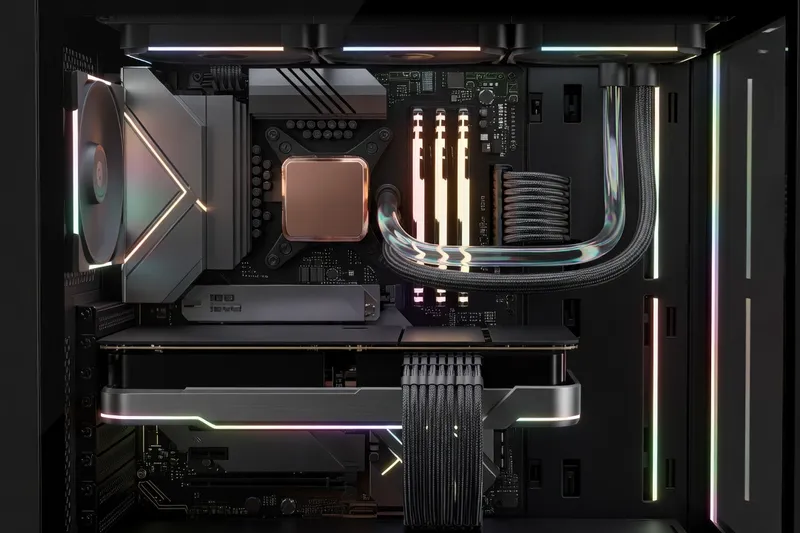
Memory stays at 32GB DDR5-6000 CL30 but with tighter sub-timings. Spending $130 instead of $110 on a kit from G.Skill’s Trident Z5 or Corsair’s Dominator Titanium line is worth the small premium for the validated EXPO profile and the binning quality. The motherboard is where this tier earns its keep: an X670E or Z890 board in the $230-280 range with 16+2+1 phase VRMs, proper heatsinks, Wi-Fi 7, USB4 and three or four M.2 slots. Cheap motherboards bottleneck high-tier CPUs under sustained load, and a quality board pays for itself in stability and upgrade flexibility. The full case for the right motherboard for VRMs and connectivity at this tier is laid out in the dedicated guide, which is worth consulting before settling on a specific SKU.
The GPU is an RTX 5070 at $600 or an RX 9070 at $580. The RTX 5070 leverages DLSS 4 Multi Frame Generation, which roughly doubles frame rates in supported games with minimal visual penalty at 1440p. The RX 9070 closes the raster gap with RDNA 4 and delivers competitive ray tracing for the first time on the AMD side. Both cards handle 1440p ultra with ray tracing on at 60-90 fps native, climbing well past 120 fps with frame generation enabled.
Storage at this tier moves to 2TB to accommodate the 150GB+ install sizes of modern games. A Samsung 990 Pro 2TB or WD Black SN850X 2TB at around $170 keeps load times short and supports DirectStorage. The PSU is an 850W 80+ Gold from Corsair, Seasonic or be quiet! at $130, which provides enough headroom for a future RTX 5080 or RX 9080 upgrade without replacing the unit. A 240mm AIO like the Arctic Liquid Freezer III or NZXT Kraken keeps the X3D or K-series CPU cool under sustained load.
$2000 high-end build: 4K gaming powerhouse
At $2000 you are buying real 4K gaming capability and the comfort margin to run it for several years without compromise. The CPU is a Ryzen 7 9800X3D at $480, which remains the fastest gaming chip on the market in mid-2026, or a Core Ultra 7 265K at $400 if you prioritize productivity and accept slightly lower peak gaming numbers. The 9800X3D’s 96MB of L3 cache continues to deliver the largest single-game performance uplift available, particularly in CPU-bound scenarios that 4K rendering shifts back into play with high-end GPUs.
For developer-grade workstation considerations on top of gaming, the references at codeyourweb.org (developer-focused hardware reading) cover compiler and container performance impact.
Memory steps up to 32GB DDR5-6400 CL30 at $150 from G.Skill’s Trident Z5 Neo for AMD or the same kit with XMP for Intel. The faster memory pays small but measurable dividends with the 9800X3D’s wider cache window. There is little benefit to going past 6400 on AM5; on Arrow Lake, DDR5-7200 can squeeze out a few more percent in specific workloads but rarely justifies the cost premium. Detailed tuning advice for fast DDR5 RAM tuning including sub-timings and FCLK ratios is covered in the memory deep-dive.
The motherboard is a top-tier X870E or Z890 board in the $350-420 range from ASUS, MSI or Gigabyte. At this price you get proper VRM cooling for sustained boost behavior, PCIe 5.0 on both the GPU slot and primary M.2, USB4 ports, Wi-Fi 7, 2.5 or 10 GbE, and the build quality to last through multiple CPU generations.
The GPU is an RTX 5080 at $1000 or an RX 9070 XT at $750. The RTX 5080 delivers genuine 4K gaming with ray tracing enabled at 60+ fps native in most titles, climbing past 100 fps with DLSS 4 Multi Frame Generation. The RX 9070 XT trails in ray tracing but matches or beats the RTX 5080 in raster performance at 4K and saves $250, which can be reinvested in a 2TB Gen5 SSD like the Crucial T705 or Samsung 9100 Pro at $240 for the absolute fastest game load times available. The PSU steps up to a 1000W 80+ Platinum from Corsair (RM1000x Shift) or Seasonic (Prime PX-1000) at $200, with the ATX 3.1 12V-2x6 connector for native GPU power delivery. A 360mm AIO is the right cooling choice for sustained load.
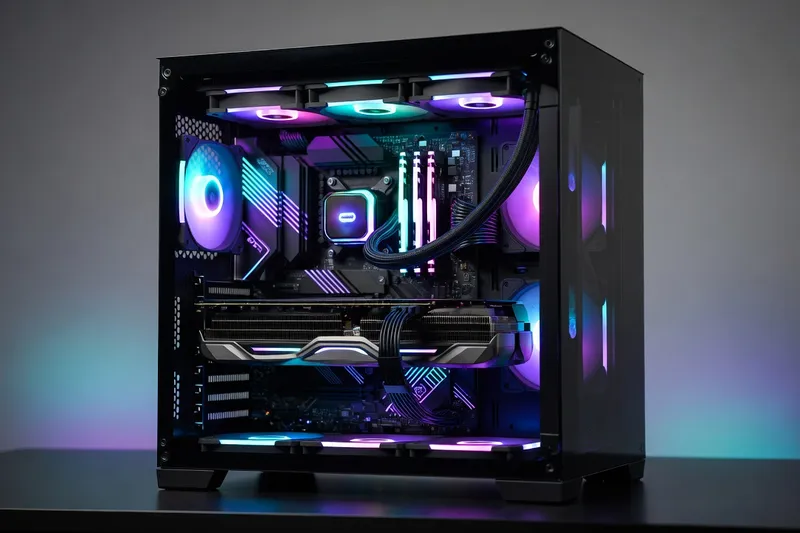
Cases, cooling and aesthetics
The case is the component most likely to outlast every other part in your build, and the wrong choice will bottleneck your thermals or your sanity. A mid-tower ATX case from Lian Li (Lancool 216, O11 Vision), Fractal (North, Pop Air), NZXT (H6 Flow) or Corsair (4000D Airflow) in the $80-150 range is the right call for almost every build above. Mesh front panels deliver 5-10 C lower CPU and GPU temperatures than glass or solid fronts, and the difference is audible: a mesh case lets fans spin slower for the same thermals, which means quieter operation.
SFF (small form factor) builds in the $1000+ range can fit in cases like the Lian Li A4-H2O, Fractal Terra or NZXT H1 v2, but they cost more in cases and cooling and constrain GPU length and CPU cooler height. Unless you specifically need the desk-space savings, a mid-tower is the better choice for performance and quietness.
For cooling, air coolers like the Thermalright Peerless Assassin 120 SE ($40) or Phantom Spirit 120 EVO ($45) handle anything up to a Ryzen 7 9700X or Core Ultra 5 with ease. Move up to a 240mm AIO (Arctic Liquid Freezer III, NZXT Kraken) at $90-130 for X3D chips or any K-series above the i5 tier. A 360mm AIO is appropriate for the $2000 build’s 9800X3D or 265K under sustained 100% load.
RGB is personal preference. ARGB fans and motherboards with USB-C connectivity have become standard at most price points, but plenty of stealth-build cases offer zero-RGB options for users who prefer a clean aesthetic. The acoustic profile matters more than the visual one: aim for a build that idles below 30 dB and stays under 40 dB under gaming load.
Common build mistakes to avoid
The single most common build failure is an underpowered PSU. People economize on the supply because it doesn’t show up in benchmarks, then wonder why their system crashes during transient GPU spikes. Buy from a tier-A or tier-B unit list, size for 25-30% headroom above your idle-to-peak draw, and prefer 80+ Gold or better for efficiency and component quality. Skipping the PSU is the fastest way to fry the rest of your build.
The second most common mistake is installing RAM in the wrong slots. Dual-channel DDR5 must be installed in slots A2 and B2 (usually the second and fourth slots from the CPU) for both AMD and Intel platforms. Installing in A1/B1 or any mismatched pair drops you to single-channel and cuts memory bandwidth in half. The motherboard manual makes this explicit; read it before installing.
Heavy GPUs above 1kg require a support bracket or anti-sag stand. Without one, the GPU’s weight bends the PCIe slot over time, eventually breaking the connector or the card’s PCB. Most modern cases now include a bracket, but cheap budget cases often skip it, so check before you build.
Case airflow is consistently underestimated. Two intake fans at the front, one or two exhaust at the rear and top, all spinning at moderate RPM with a mesh front panel will outperform expensive specialty cooling setups in restrictive cases. Positive air pressure (slightly more intake than exhaust CFM) keeps dust out of the case, which extends component life and reduces maintenance frequency.
Finally, ignoring BIOS updates and CPU thermal paste application leaves performance on the table. Update the motherboard BIOS to the latest stable release before installing the OS, enable EXPO/XMP for your memory, and apply thermal paste in a small pea-sized dot in the center of the IHS rather than spreading it manually. For users who want to push the platform further, the overclocking guide for tuning headroom covers safe undervolting and PBO/PL1 adjustments that improve both performance and thermals without voiding warranties.
If you prefer a compact form factor that takes half the desk space, see our mini-ITX builds guide for 2026 with three complete reference builds.