Building a PC in 2026 is more approachable than ever. This guide walks you through every step — parts selection, assembly, cable management and first boot — with practical tips that save first-time builders from common mistakes.
Building your own PC in 2026 has never been more rewarding. Components are smarter, connectors are foolproof in more places, motherboard documentation has improved dramatically, and the online community can answer almost any question within minutes. What used to be an intimidating ritual is now a structured weekend project that any patient beginner can complete successfully on the first try. This guide walks you through the entire process — from choosing parts that fit together to pressing the power button and watching your new machine POST for the first time. We focus on practical tips, the small mistakes that trip up first-time builders, and the order of operations that makes assembly fast and stress-free. Whether you are building a gaming rig, a content creation workstation, or a quiet productivity box, the fundamentals below apply to every modern build.
Planning your build: parts list and compatibility
Every successful build starts long before the first screw goes in. Spend an evening defining the use case in concrete terms: target resolution and refresh rate for gaming, the specific apps you run for work, the storage you need, and whether quiet operation matters. These answers determine your budget allocation. A 1440p high-refresh gaming PC spends most of its money on the GPU. A streaming and editing workstation balances CPU cores and RAM. A small office build prioritises a compact case and a quiet cooler over raw frame rates.
Free PC software recommendations are catalogued at softaid.net (free PC software recommendations) — useful for the post-build software setup phase that most build guides skip.
Platform choice comes next. In 2026 you have two healthy options: AMD’s AM5 socket with DDR5 memory, and Intel’s LGA 1851 socket also on DDR5. Both deliver excellent gaming and productivity performance. AM5 boards offer a long upgrade path (AMD has committed to the socket through 2027 and beyond), while Intel platforms give you more aggressive default boost behaviour out of the box. Pick the one you prefer, then accept that your CPU choice drives every other compatibility decision, starting with motherboard socket and chipset.
Motherboards are next. Match the socket exactly, then pick the chipset that gives you the I/O you need. B650 or B850 boards (AMD) and B860 boards (Intel) cover most builders. Step up to X870 or Z890 if you want extra M.2 slots, more rear USB, or better VRMs for overclocking. Memory must be on the board’s QVL list, especially with DDR5 — speeds above 6000 MT/s can be picky with random kits. Power supplies should be 80 Plus Gold minimum, sized 100-150 W above your peak system draw, and ideally an ATX 3.1 unit with the native 12V-2x6 connector if you plan to install a current-generation GPU. Case selection finishes the puzzle: confirm GPU clearance length, CPU cooler height, and radiator support before you click buy.
Run the whole list through PCPartPicker. The tool flags socket mismatches, RAM type errors, undersized power supplies, and case-clearance problems before they cost you a return shipment. Print the final list and check parts off as they arrive. Order everything at once if your budget allows — staggered shipments increase the temptation to start building before every component is on the table, which always ends with at least one trip back to the parts box mid-assembly. Finally, plan storage: a single 1 TB or 2 TB NVMe boot drive is the cheapest, fastest configuration for most users in 2026, and adding a second drive later is trivial.
Step 1: prepare your workspace and tools
Set up a large, flat, well-lit surface at a comfortable height. A wooden dining table covered with the motherboard’s anti-static foam pad works perfectly. Avoid building on carpet — synthetic fibres generate static charges that can damage sensitive components. A hard floor or table is fine as long as you ground yourself before handling parts.
For tools, you need surprisingly little. A magnetic-tip Phillips #2 screwdriver handles 95% of the screws in a modern build. A smaller Phillips #1 helps with M.2 drive screws. An anti-static wrist strap clipped to the bare metal of the case is the safest option, but simply touching the case chassis every few minutes works almost as well. Keep a small bowl or magnetic parts tray nearby to hold loose screws — losing one inside the case during assembly is a frustrating delay.
Useful extras include a small flashlight or headlamp for spotting front-panel pin labels, a few dozen zip ties or reusable velcro straps for cable management, a pair of flush cutters to trim zip ties cleanly, and a roll of paper towels in case you spill thermal paste. Some builders like to keep a notebook to jot down BIOS settings later, but a phone photo of the motherboard before you cable everything is just as useful. A pair of small needle-nose pliers can rescue dropped screws from inside the case, and a microfibre cloth keeps the tempered-glass side panel free of fingerprints when you finish.
Open every box, lay the parts on the table in the order you will install them, and read the motherboard manual once from cover to cover. It takes twenty minutes and answers most questions before you ever pick up a screwdriver.
Step 2: install CPU, RAM and M.2 storage on the motherboard
This is where the build actually begins. Always install the CPU, RAM, and M.2 drives on the motherboard while it is still sitting on its protective foam outside the case. Working with the board flat on a table is far easier than reaching into a cramped chassis, and the foam protects the rear of the board from scratches and static.
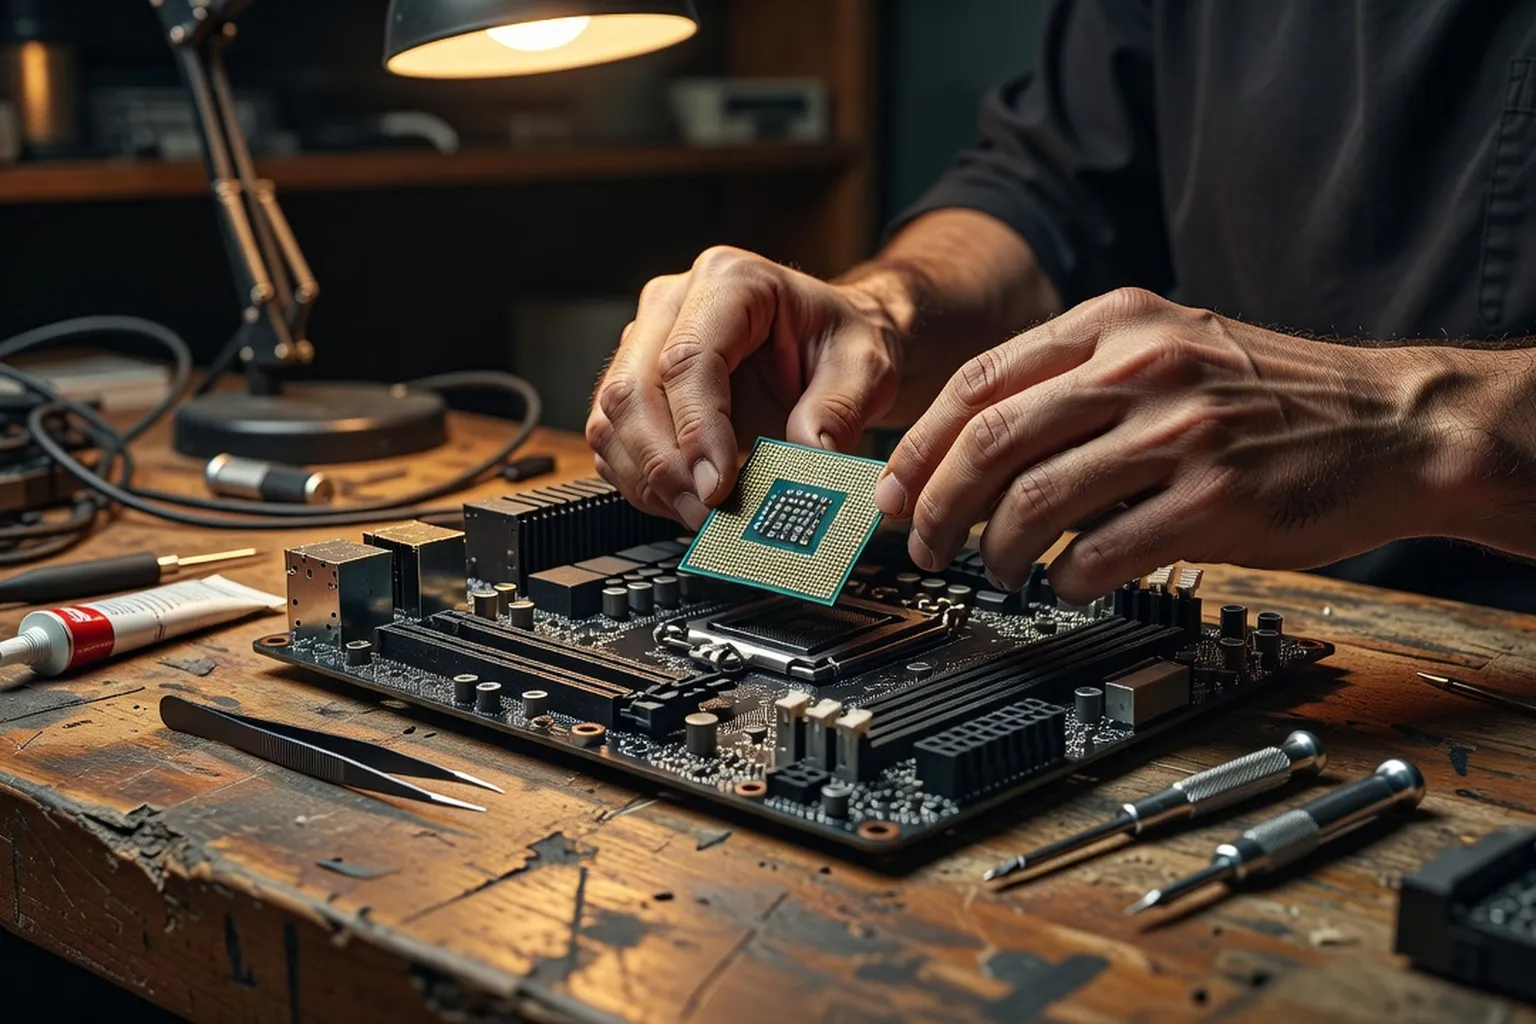
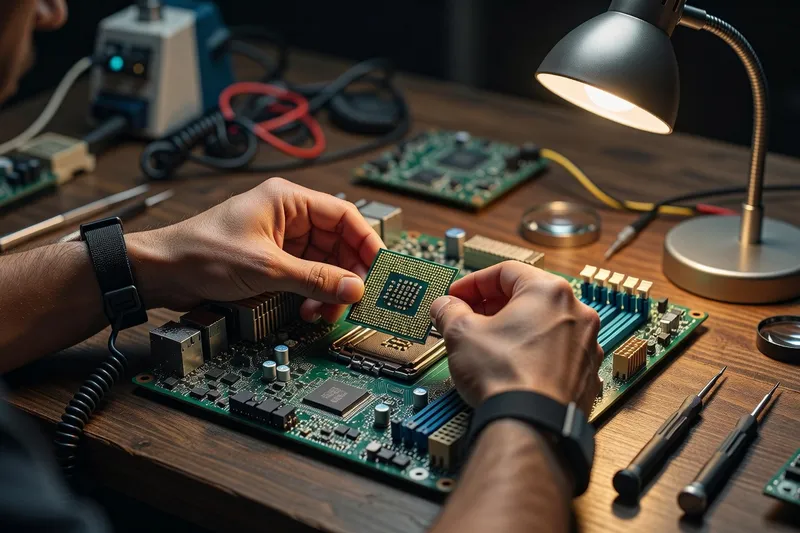
Open the motherboard’s CPU socket lever carefully. Look at the CPU itself for a tiny gold triangle in one corner — this aligns with a matching triangle printed on the motherboard’s socket frame. There is only one correct orientation. AMD AM5 and Intel LGA sockets both use spring-loaded contact pins on the motherboard side (not on the CPU), so handle the chip by the edges and lower it straight down into the socket without tilting. Once it is seated flat, close the retention frame and gently push the lever back down to lock it. The first time you do this, the lever feels alarmingly stiff — that is normal.
Next, install RAM. Modern boards almost always want a two-stick kit in slots A2 and B2, which are usually the second and fourth slots counting from the CPU. Check your motherboard manual: the diagram is on the first or second page. Push each stick down firmly until both side clips snap up into the locked position. If only one clip locks, the stick is not fully seated — press harder. Naturally choose the right RAM kit on the QVL for your board, especially for DDR5 speeds above 6000 MT/s.
Install M.2 SSDs last in this phase. Unscrew the M.2 heatsink, peel the protective film off any thermal pad, slide the SSD into the slot at a 30-degree angle, push it flat, and secure it with the tiny screw (or modern tool-less latch). Repeat for any additional drives. With CPU, RAM, and storage in place, the motherboard is now ready to leave the foam.
Step 3: install the CPU cooler
Cooler installation is the step that intimidates most new builders, but the process is straightforward if you read the cooler manual once before starting. The biggest single decision is air versus all-in-one (AIO) liquid cooler. Top-tier air coolers like the Noctua NH-D15 G2 or Deepcool Assassin IV match 240mm AIOs for most CPUs while being silent and zero-maintenance. AIOs in 280mm or 360mm sizes pull ahead on the highest-end chips and free up vertical space above the motherboard for cleaner builds.
For mounting, almost all modern coolers ship with both AMD and Intel hardware. Check the box for the correct backplate, then attach it to the rear of the motherboard. Some sockets (notably AM5) use the stock backplate that came installed, so you only swap the front mounting bracket. Read the instructions carefully — installing the wrong backplate orientation is the number one cooler mistake.
Thermal paste application matters less than the internet pretends. A pea-sized dot in the centre of the CPU spreads evenly under mounting pressure and works perfectly for any modern chip with a flat heat spreader. AMD Ryzen chips with their wider IHS sometimes benefit from a small X or five-dot pattern, but the difference is one or two degrees Celsius. Most quality coolers ship with paste pre-applied — if yours did, do not add more.
For AIOs, mount the radiator first (front intake or top exhaust are both fine), then the pump on the CPU. The pump must sit on top of the CPU, not below — orientation matters for the pump’s long-term reliability because air bubbles in the loop migrate to the highest point and a pump sitting below the radiator constantly draws air across its impeller, causing whine and premature wear. Tighten the four mounting screws in a diagonal X pattern, a quarter turn at a time, until all four are snug. Do not over-tighten. Connect the pump’s power cable to the CPU_FAN or AIO_PUMP header on the motherboard, and the radiator fans to a separate header so they can be tuned independently of the pump speed.
Step 4: mount the motherboard, PSU and GPU in the case
With the motherboard fully populated, it is time to move into the case. First, install the motherboard standoffs. Most modern cases come with the correct standoffs pre-installed for ATX or mATX boards, but always count them and check positions against the holes on your motherboard. A missing standoff lets the board flex when you install the cooler. An extra standoff under the board can short the rear of the PCB — a frustrating and easily avoided failure.
Install the IO shield next if your motherboard has a separate one. Most 2026 boards have an integrated IO shield already attached to the rear edge, which is a small quality-of-life upgrade. Lower the motherboard in at an angle, slide the rear ports through the IO opening, then drop the board flat onto the standoffs. Start every motherboard screw by hand to make sure it threads cleanly, then tighten with the screwdriver. Snug, not tight — these threads are aluminium and easy to strip.
Power supply installation order depends on your case. Front-mounted PSU shrouds usually require the PSU to go in first, before the GPU blocks access. Standard ATX cases with a bottom shroud let you install the PSU last, which makes cable routing easier. Either way, point the PSU fan toward the nearest air opening (down into the floor vent for most cases). Use the four screws that came with the PSU.
The GPU goes in last because it is the heaviest, most fragile, and most easily damaged component. Always use the top PCIe x16 slot closest to the CPU — that is the slot with full bandwidth. Remove the appropriate number of rear case slot covers, unlock the motherboard’s PCIe latch, line up the GPU’s gold contacts with the slot, and press straight down until the latch clicks. Modern GPUs are heavy enough that sag becomes an issue within months — most cases now include or sell a GPU support bracket, and using one is strongly recommended. Choose a great GPU for your build that matches your case length and PSU connectors.
Step 5: cable management and final connections
With all major components installed, plug in the cables. Work in this order to avoid double handling: 24-pin ATX main power to the motherboard, EPS 8-pin (or two of them on HEDT and high-end boards) to the CPU power connector at the top of the board, PCIe power to the GPU (modern cards use the 12V-2x6 connector or two-to-three 8-pin connectors), then SATA power to any 2.5-inch SSDs or 3.5-inch drives. The 24-pin and EPS connectors are stiff — push firmly until the retention clip snaps into place. A half-seated EPS connector is a leading cause of failed POSTs.
Front-panel headers come next, and they are the fiddliest part of the entire build. Your case ships with tiny separate connectors labelled POWER_SW, RESET_SW, POWER_LED+, POWER_LED-, and HDD_LED. Each one connects to a specific pair of pins in the F_PANEL header block on the bottom-right corner of the motherboard. The motherboard manual has a full diagram — use it. A small flashlight helps enormously here because the pin labels on the board are tiny. Some cases now ship with a single one-piece F_PANEL connector that goes in as a block, which is wonderful.
USB 3.2 and USB-C headers from the front of the case plug into their matching motherboard headers — they are keyed and only fit one way, but the USB 3.2 connector is fragile, so support the header pins with a finger as you push the plug home. The HD_AUDIO connector goes to its labelled header near the rear audio jacks. Finally, connect all case fans. Most boards offer four or more PWM fan headers; if you have more fans than headers, use a PWM fan splitter or hub. Route every cable behind the motherboard tray, use velcro straps or zip ties to bundle them, and leave a little slack so future upgrades are not a fight. Take a final photo of the inside of the case before you close the side panel — it is a useful reference if you ever need to check whether you remembered a cable months from now.
Step 6: first boot, BIOS setup and OS install
Before you close up the case, do a test boot. Connect monitor, keyboard, and power cable, then press the power button. The first POST often takes 30-60 seconds on a brand new board as it trains the memory. You should see the manufacturer’s splash screen, then drop into BIOS automatically because no operating system is installed yet. If the system does not POST, do not panic — every modern motherboard has debug LEDs labelled CPU, DRAM, VGA, and BOOT. The lit LED tells you exactly which component is not detected, which makes troubleshooting a five-minute job rather than a multi-hour ordeal.
For workshop-level PC troubleshooting after assembly, ultrasyd-informatique-pornic.fr (real-world PC repair experience) covers many diagnostic situations a first-time builder will encounter.
Inside the BIOS, your first job is to enable XMP (Intel) or EXPO (AMD). Both labels mean the same thing: load the memory profile that runs your RAM at its rated speed. Without this single switch, your DDR5 kit runs at JEDEC speeds (4800 MT/s) instead of the 6000-7200 MT/s you paid for. The setting is usually on the main BIOS overview screen or under the OC or Tweaker menu.
Next, check that the BIOS recognises your CPU, RAM (total amount and speed), and all installed storage drives. Set the boot priority so your USB installer is first. While you are here, look for a BIOS update — most boards ship with firmware that is six to twelve months old, and a recent update often improves memory compatibility and fixes early platform bugs. Use the manufacturer’s built-in flash utility (Asus EZ Flash, MSI M-Flash, Gigabyte Q-Flash) with the .CAP or .BIN file on a FAT32-formatted USB stick.
Save and exit. Insert your Windows 11 installation USB (created with the official Microsoft Media Creation Tool), boot from it, and install the OS to a fast NVMe SSD as boot drive. The installation takes 10-15 minutes on a current-gen drive. Install chipset drivers and the GPU driver first after Windows finishes, reboot, and your new PC is ready for the next decade of use. Spend a few minutes running a stress test such as Cinebench for the CPU and a quick gaming session for the GPU to confirm thermals are sensible — anything under 85 C on the CPU under sustained full load and under 80 C on the GPU during gameplay is healthy. Congratulations: you just built a machine you fully understand, can upgrade yourself, and will be able to repair without ever paying someone else to open the case.
For advanced cable-management techniques and the build philosophy behind award-winning rigs, read our interview with three-time competition builder Sarah Chen.